.png?width=150&height=63&name=TWRlogo-regmark_blueblack%20(1).png)
.png)


The first step to getting paid is creating and sending an invoice to your customer. To streamline the invoicing process, you may use accounting software, like Patriot Software, for sending invoices.
Patriot’s Accounting Premium and Accounting Basic software options make it easy for you to create and send invoices with just a few clicks. Find out how simple it is to invoice in Patriot’s accounting software below.
Before you create an invoice in Patriot...
Before you can begin invoicing your customers or your clients’ customers in Patriot Software, you have to follow a few steps.
Prior to creating and sending invoices:
1. Add the customers in the software.
If you haven't added any customers: Accounting > Your Company > Add a Customer.
If you have added a customer: Accounting > Your Company > Customers > Add New.
2. Set up your or your client's products and/or services.
Go to Accounting > Your Company > Products & Services to add a new product or service.
3. Set the sales tax rate for each offering.
Add a product or service before setting sales tax rates.
To add rates, go to Settings > Accounting > Customer Invoices > Sales Tax Rates
You can also add customers, products, services and new sales tax rates on the fly while creating an invoice in the software.
Invoicing your customers in Patriot Software
Patriot’s Accounting makes it a breeze to create and send invoices to customers. Get the scoop on how simple it is to invoice customers in Patriot Software by checking out the steps below.
To create an invoice in your Patriot account, go to Accounting > Customer Tasks > Create Invoice. From there, your screen will look like this:
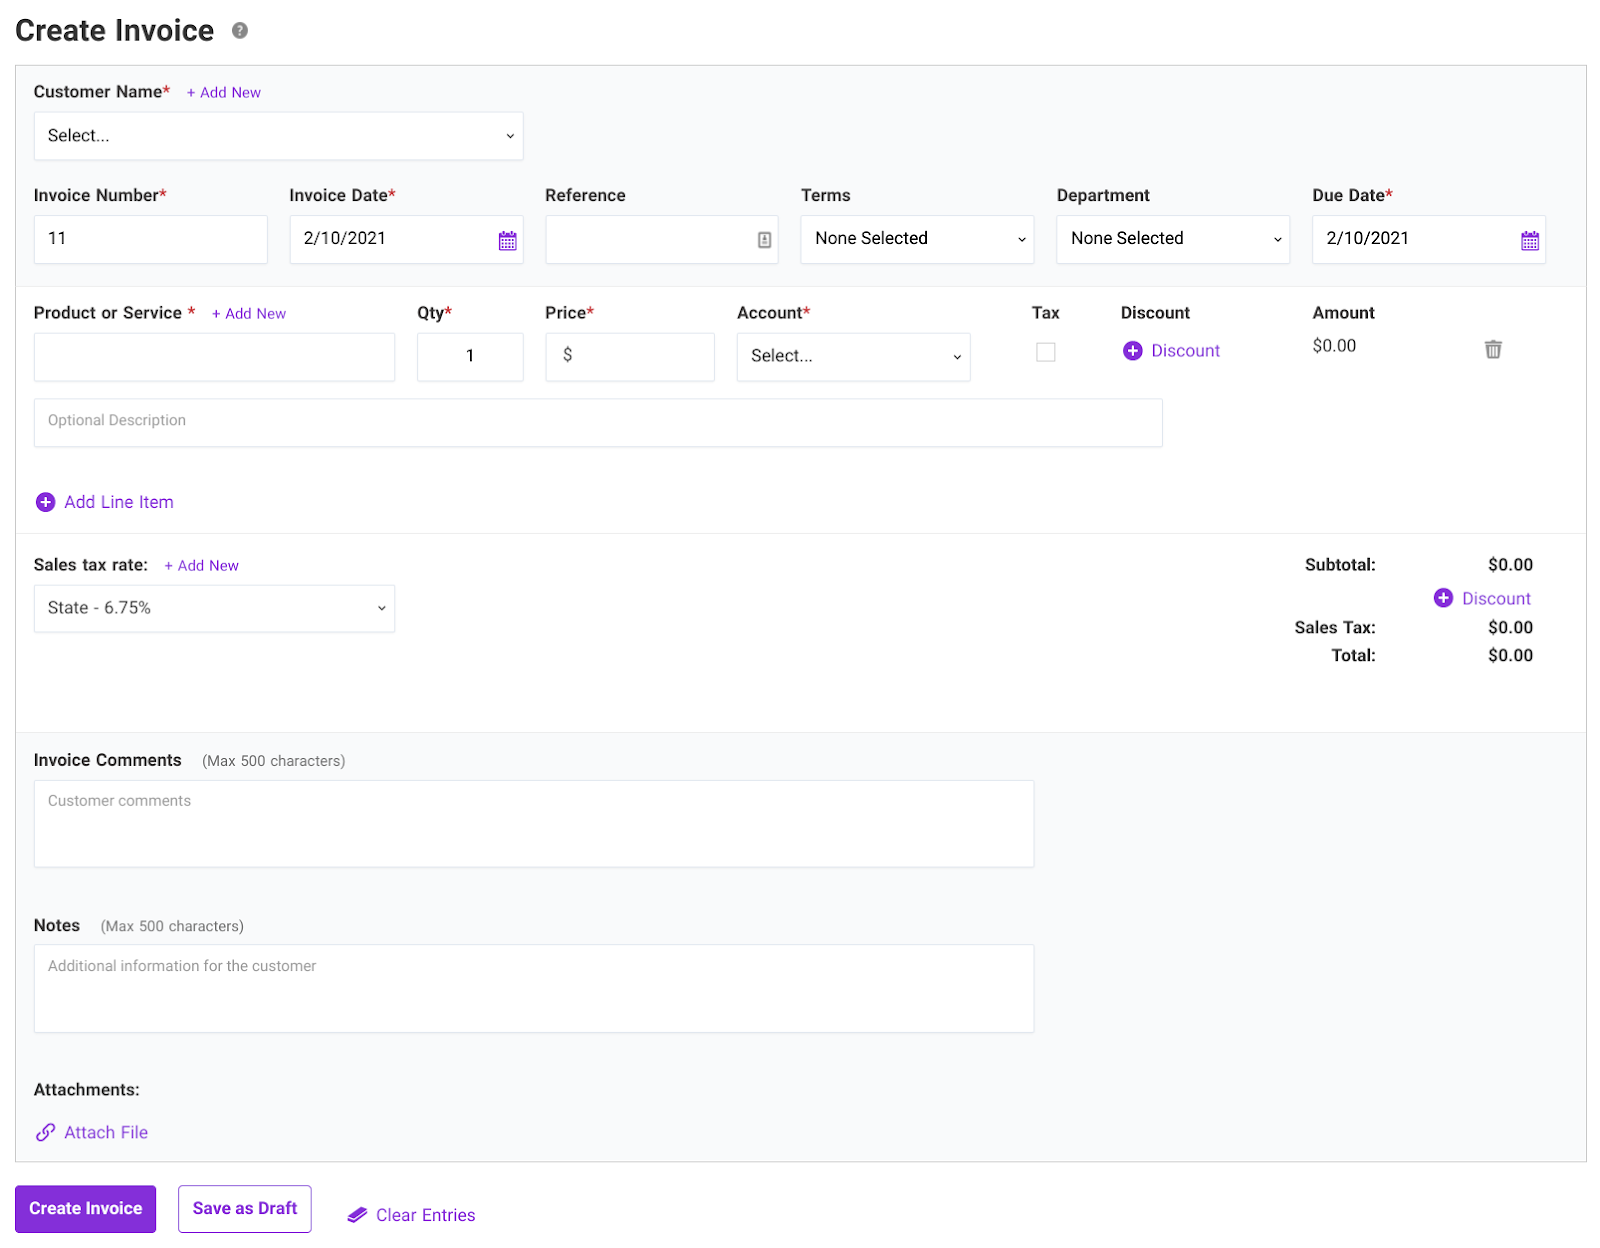
To start creating your invoice, go box-by-box and fill out the information. Some boxes are optional while others are marked as required with an asterisk symbol (*).
To create an invoice, select or fill out the:
- Customer Name
- Invoice Number
- Invoice Date
- Due Date
- Product or Service
- Quantity (Qty)
- Price
- Account
To create your invoice, follow these steps:
1. Select the Customer Name*. You can easily add more customers by clicking “+Add New” next to Customer Name.
2. Set the Invoice Number*, if needed. This automatically shows the next available number since the last invoice you created. You can change this number, if necessary, but you cannot leave the Invoice Number box blank.
3. Choose the Invoice Date*. The software automatically preselects the current date but you can change it.
4. Enter a Reference Number (optional). You can use a reference number for identification and tracking purposes.
5. Select the payment Term (optional). Selecting the payment term (e.g., Due on Receipt, Net 5, etc.) will automatically calculate the due date for you.
6. Select a Department (optional). If you have departments set up in your accounting software, you can select a department on your invoice.
7. Select a Due Date*. The due date automatically defaults to the current date if you do not select a payment term. If you have not selected a term, you can change the due date to whatever date you’d like.
8. Select the Product or Service from the drop-down list*. You can add a new product or service by clicking “+Add New”.
9. Enter the Quantity*. The quantity defaults to 1, but you can change it if necessary.
10. Check the Price*. The price automatically populates based on the Product or Service you select and the quantity you enter. If needed, you can change the price on the invoice.
11. Check the Account*. The income account you selected when you created the product or service automatically populates in the “Account” box. You can change the Account, if needed. The customer will not see the account when you print the invoice.
12. Mark the checkbox for Tax (optional). If the product or service is subject to sales tax, make sure the “Tax” checkbox is marked. The Tax checkbox will already be checked off if you set the product or service as “Subject to Sales Tax” when you added it in the software.
13. Add a Discount (optional). Include a discount description, type (e.g., percentage), amount (e.g., 10%), and the account to record the discount. You can also add a discount to the entire invoice by selecting “+ Discount” at the bottom under Subtotal.
14. Add an Optional Description (optional). The description appears on the invoice and in reports.
15. Add another Product or Service (optional). If necessary, click “+ Add Line Item” to add another product or service to the invoice.
16. Double-check Sales tax rate (optional). The sales tax rate you add in your Settings shows up under “Sales tax rate” on your invoice. If necessary, you can add a new sales tax rate on-the-fly by clicking “+ Add New”. If the products(s) and/or service(s) on your invoice do not have sales tax, select “No Sales Tax Applied” in the Sales tax rate drop-down list.
17. Add Invoice Comments (optional). Comments appear to customers at the bottom of their invoice.
18. Add Notes (optional for Accounting Premium). Accounting Premium customers can set a default note on their invoice template, customize the note on each invoice or leave the note section blank.
19. Attach files (optional for Accounting Premium). Accounting Premium customers can attach electronic files and receipts to an invoice by clicking “Attach File”.
20. Save your invoice. To create and save your invoice, click the “Create Invoice” button at the bottom of the invoice.
When you create an invoice, you can also:
- Delete a Product or Service line item by clicking the trash can icon

- Click “Clear Entries” to wipe out everything you’ve entered so far on the invoice
- Click “Save Draft” to save the invoice as a draft and revisit it later

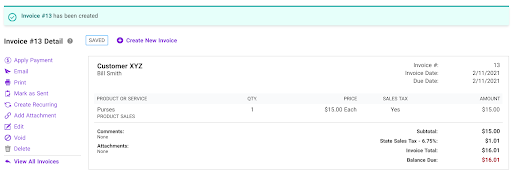
After you create an invoice in Patriot...
Once you create your invoice in Patriot Software, you have a few options on what to do with your invoice:
- Apply Payment: Apply a payment you received from the customer to the invoice.
- Email: Email a copy of the invoice to your customer.
- Print: You can print a PDF version of your invoice.
- Mark as Sent: Mark the invoice as sent if you’ve opted to send the invoice another way than email.
- Create Recurring (Accounting Premium): You can set recurring invoices so that the same invoice is automatically created and sent to the customer.
- Add Attachment (Accounting Premium): Attach electronic files and receipts, if necessary.
- Edit: Make changes to the invoice.
- Void: Void the invoice to reverse the entry.
- Delete: Delete the invoice completely. You can still view deleted entries on the Modified Transactions Report.
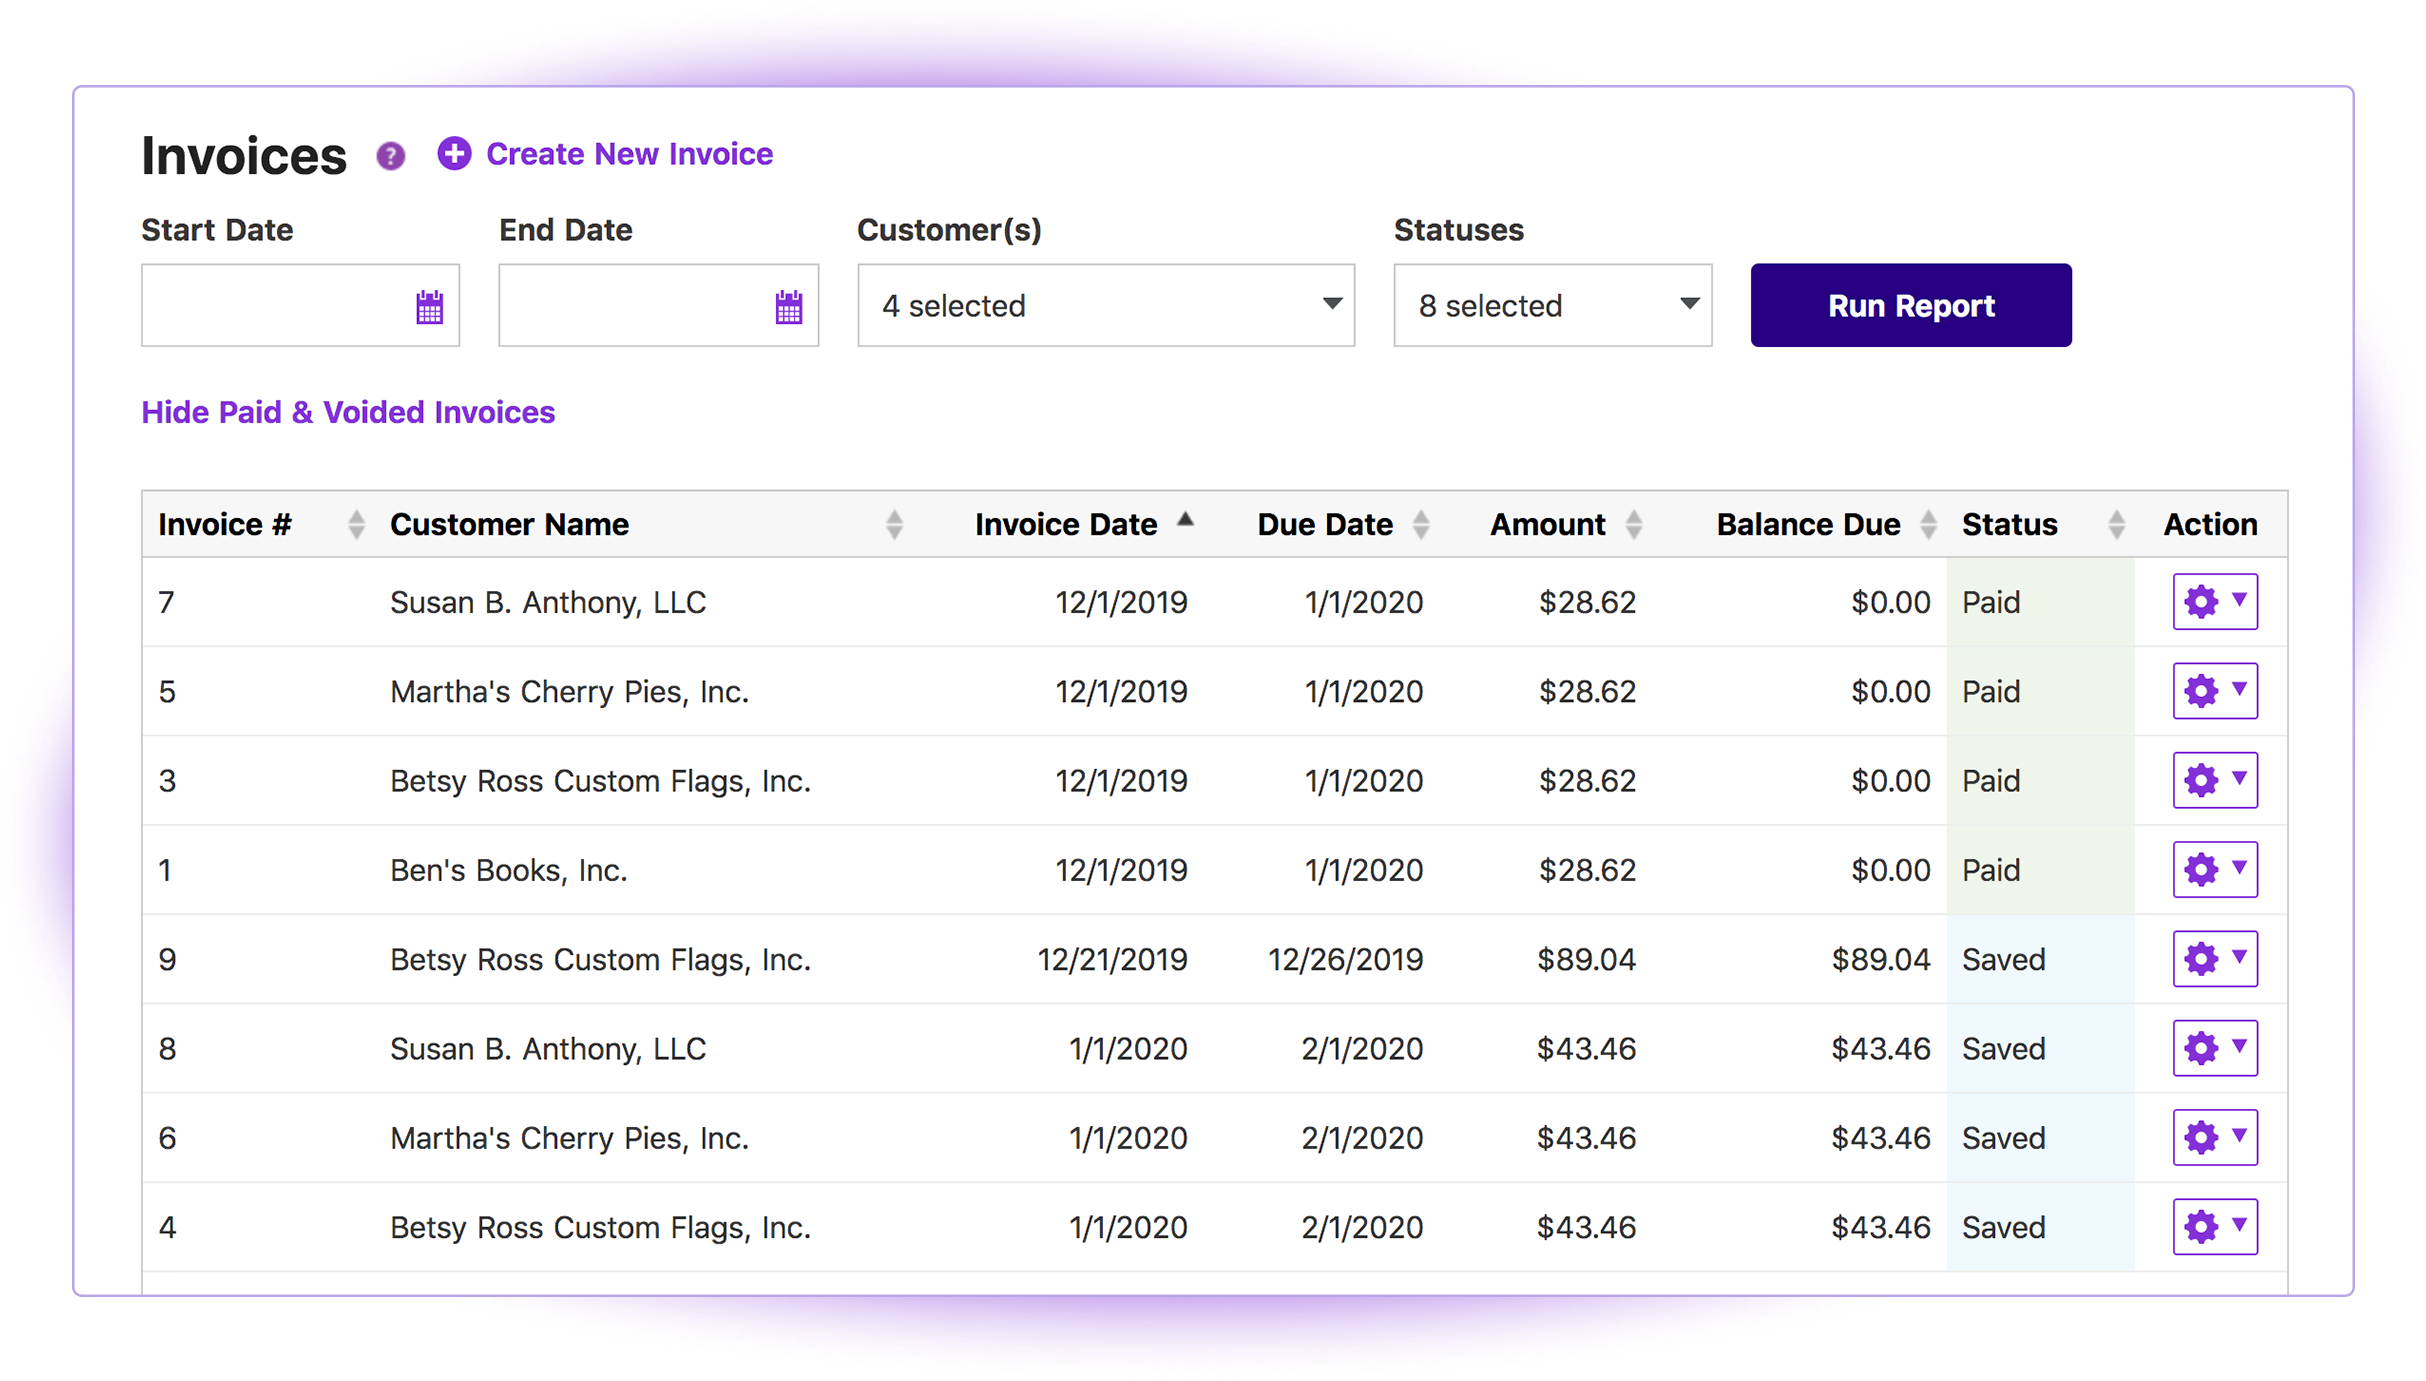
You can also click “View All Invoices” to go to a list of all the invoices you have created (remember, this won’t show your deleted invoices).
Want to create another invoice? No problem. Just select “Create New Invoice” and follow the same steps from above.
Interested in giving Patriot's accounting software a go? Start here
You're already one step ahead of the curve because you now know how to invoice in Patriot Software. Want to take advantage of other top-notch accounting features (like creating estimates and converting them to invoices)? Sign up for Patriot’s Accounting Premium or Accounting Basic software.
Accountants can join Patriot’s Partner Program to get special pricing for their clients and free accounting software for their firm (must have six or more client accounts). Plus, new accounts receive a 30-day free trial.
What are you waiting for? Streamline your firm’s and clients’ accounting today!


Do you have questions about this article? Email us and let us know > info@woodard.com
Comments: