It's that time of year when auditors are requesting invoices or tax return preparers need supporting documentation. QuickBooks Online (QBO) offers a variety of features designed to streamline accounting processes, including the ability to attach documents directly to transactions. However, retrieving these documents for audit or tax preparation purposes can sometimes present a challenge. This article explores a practical solution to this common problem, making document retrieval from QBO less tedious.
Direct access to QuickBooks isn't always the answer
While providing read-only access to auditors or tax preparers might seem like the easiest solution for sharing documents, it's often not feasible due to privacy concerns and the potential sensitivity of financial data. Full access could inadvertently expose more information than intended, creating security risks. In these cases, exporting the documents from QuickBooks is the better practice.
How to export documents from QuickBooks
To export attachments from QuickBooks Online, start by opening the Attachments screen. Select Settings (Gear Icon) | Lists | Attachments.
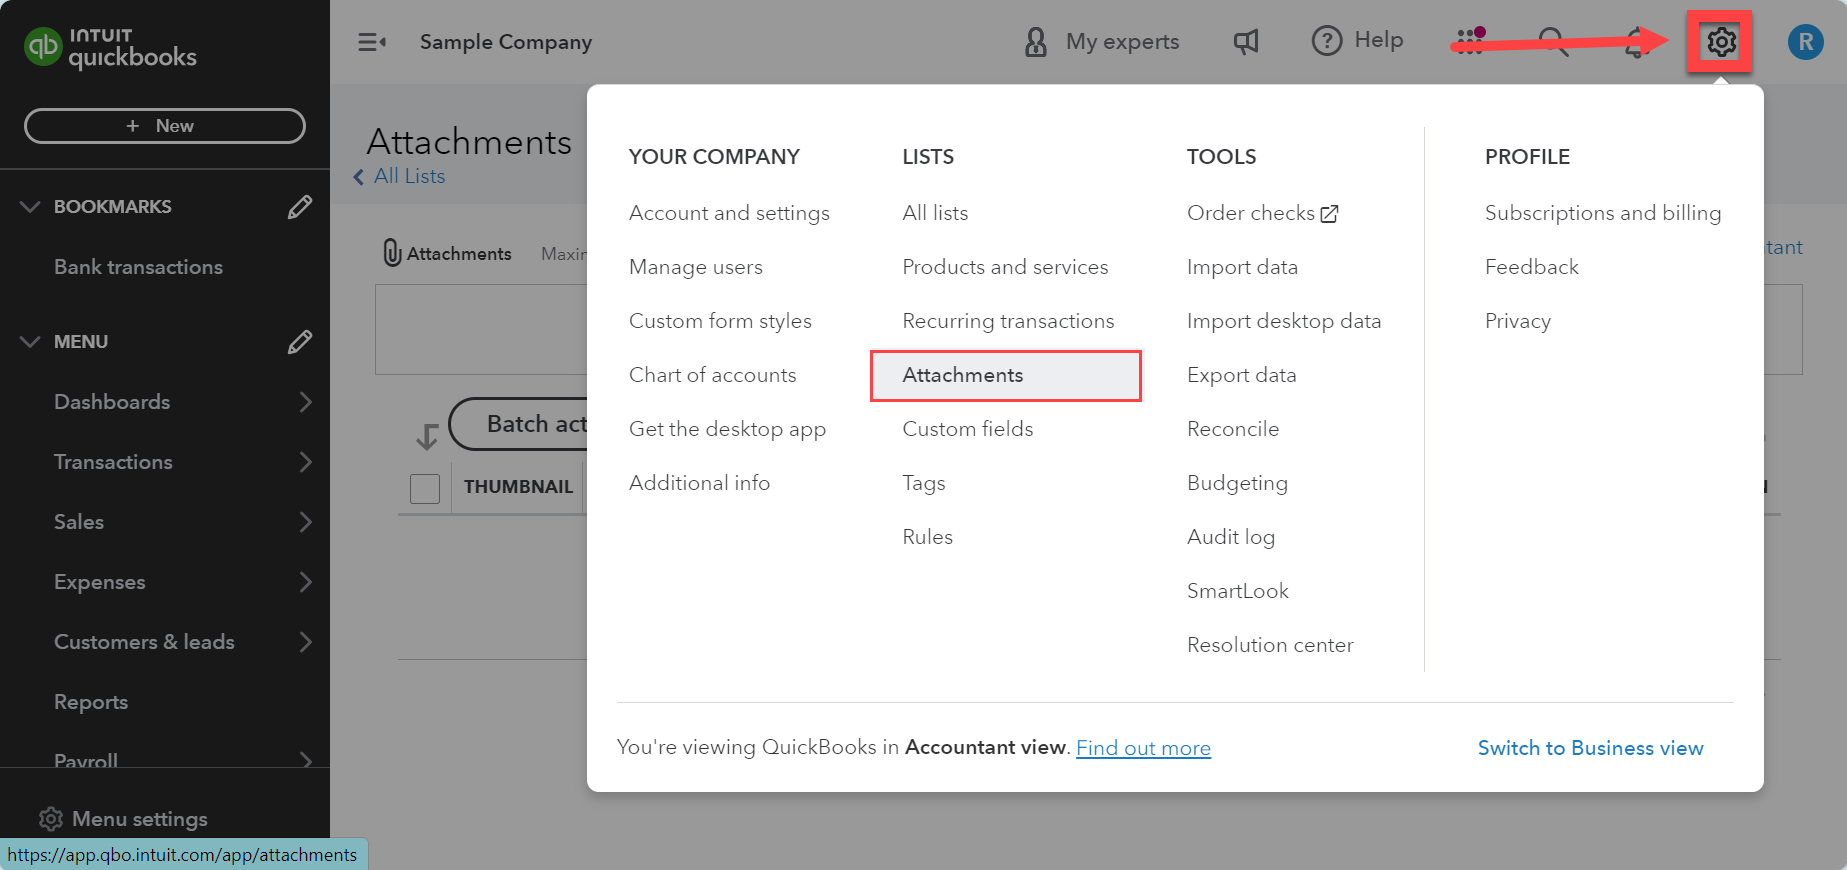
Notice that the platform doesn't offer a straightforward method for filtering and exporting documents, which can be particularly frustrating when trying to locate specific attachments among a list of many files.
Users can streamline the selection process by adjusting the settings to control the number of documents displayed per page and organizing them by name or upload date. This section offers tips for utilizing these features to their full potential, ensuring that you can efficiently find and select the documents needed for your audit or tax preparation tasks.
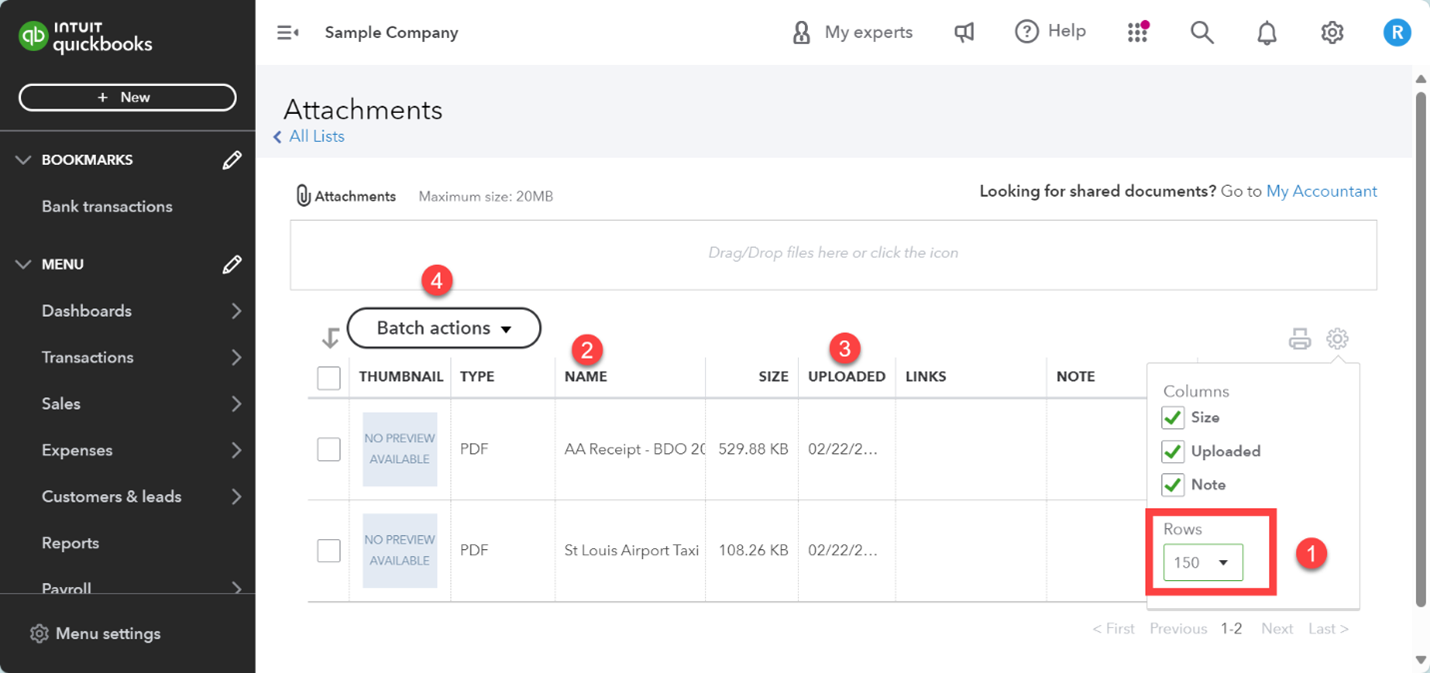
1. Manage the number of documents for export by clicking on the Gear icon located at the top right corner of the grid, then choose the desired amount of documents per page (options include 50, 75, 100, 150, or 300).
2. Select the order of the documents that appear on the page by clicking on the Name column. A useful tip for a sales tax audit is to name your documents with Sales Tax, ST, or something similar. This way, when you sort the list by name, they will all be listed together.
3. Select the order of the documents based on the upload date (not the transaction date).
4. To download multiple documents on a page at once, select the documents you want and then choose Batch Actions | Export.

It's also important to note that QuickBooks Online imposes a limit on the number of documents that can be downloaded at once, often capping the number at 150 due to file size download constraints.

Simplifying the Extraction Process
After you download the .zip file, the real challenge begins because each type of document is listed in a different folder, meaning you must extract the documents from their individual folders within the zip file. This section reveals a clever trick to bypass this tedious task, allowing for the quick consolidation of documents into a single folder, thereby saving time and reducing frustration.
First, extract the main folder within the zip file, which is labeled Bill, and then open the Bill folder. Type an * in the search window – in this example, it says Search Bill.
![]()
![]()
This will produce a list with your file folders at the top and all the documents within those folders listed below the folders. This format will allow you to select the documents you would like in a single window and drag and drop them into a single folder for easy sharing.
A special acknowledgment to Quintin Baldwin of Blue and Co.'s tax department for his invaluable tip on using the search function to streamline the extraction process. This expert advice exemplifies the community's willingness to share knowledge and solutions, enhancing efficiency for all QuickBooks users.
Conclusion: Enhancing Efficiency in Document Retrieval
In conclusion, while QuickBooks Online serves as an indispensable tool for accountants and financial professionals, navigating its document management features can sometimes be challenging. However, with the right strategies and a bit of insider knowledge, retrieving attached documents for audits or tax preparation can be transformed from a daunting task into a streamlined, manageable process. This article provides a step-by-step guide to overcoming these hurdles.
.png?width=150&height=63&name=TWRlogo-regmark_blueblack%20(1).png)
.png)







Do you have questions about this article? Email us and let us know > info@woodard.com
Comments: